How add-on clothing works in FiveM, the files a clothing pack needs, the limits that break it — and how to build one in ten minutes with a cloth tool instead of renaming files by hand.
Custom clothing on a FiveM server is a resource like any other: a folder in resources, started from server.cfg. What makes it hard is what goes inside that folder — GTA V finds clothing by file name, not by content, so one wrong number and a jacket loads as trousers, or not at all.
This guide covers how add-on clothing works, what a working pack contains, and the mistakes that break most hand-made packs. Then it builds the same pack with Koja Cloth Tool, a FiveM cloth tool that does the naming for you.
What a clothing pack is made of
Every garment is two kinds of file:
- A .ydd file — the model (the drawable). One per garment.
- One or more .ytd files — the textures. Each
.ytdis a colour or pattern variant of that model:a,b,cand so on. - Optionally a .yld file — cloth physics data, for garments that move, like coats and skirts.
Each garment belongs to a gender (the male or female freemode ped), a slot — a component such as a top (jbib), legs (lowr) or undershirt (accs), or a prop such as a hat (p_head) — and has a drawable number inside that slot.
The add-on structure FiveM expects
An add-on pack is its own collection: a name of yours that keeps your drawables apart from Rockstar's. The files in stream carry that name, the slot and the number:
your_pack/
├─ stream/
│  ├─ mp_m_freemode_01_yourpack^jbib_000_u.ydd
│  ├─ mp_m_freemode_01_yourpack^jbib_diff_000_a_uni.ytd
│  ├─ mp_m_freemode_01_yourpack.ymt
│  └─ ...
├─ mp_m_freemode_01_yourpack_shop.meta
└─ fxmanifest.lua
Two generated files make the clothes selectable in game: the .ymt, which lists every drawable and its texture variants, and the shop meta, which registers the collection. The manifest loads the shop meta as a data file:
fx_version 'cerulean'
game 'gta5'

files { 'mp_m_freemode_01_yourpack_shop.meta' }
data_file 'SHOP_PED_APPAREL_META_FILE' 'mp_m_freemode_01_yourpack_shop.meta'
Then the folder goes into resources, ensure your_pack goes into server.cfg, and after a restart the clothes appear in your clothing menu after the base game's.
What breaks hand-made packs
- Wrong names. A missing
^, a texture letter out of order or a number that does not match its model, and GTA silently skips the file. - Duplicate drawable numbers in one slot — one garment overwrites the other.
- Textures the game dislikes: sizes that are not powers of two, no mipmaps, the wrong compression. They bloat the pack and load blurry or not at all.
- Slot limits. A collection holds up to 128 drawables per component slot, per gender. Past that GTA does not warn you — it loads the wrong item or nothing.
- Clothes that vanish after a gamebuild change. Saved outfits store a drawable's position in the whole list, and a new gamebuild adds Rockstar items in front of yours. Store the collection name and the item's index inside it instead, and read it with FiveM's collection natives.
tip
If you only remember one rule: never rename clothing files by hand. Let a tool derive every name from the gender, slot and number.
Building the pack with Koja Cloth Tool
Koja Cloth Tool is a free Windows app that owns all of the above — the naming, the .ymt, the shop meta and the manifest. It needs Windows 10 or 11 and your own GTA V install (Legacy or Enhanced), which it reads the freemode ped from for the preview.
- 01Create a project. Everything you import is copied into it, so your originals are never modified. Already have a Durty Cloth Tool project? Import the
.dctprojand it comes across with its slots, genders and numbers. - 02Add items and import your files. Give each item a gender, a slot and a number, then import its
.yddand.ytdfiles — or a whole folder at once. - 03Check it on the ped. The garment appears on the freemode ped with your real textures, lit the way GTA lights it, with cloth physics and walk and run previews.
- 04Optimise the textures. Right-click and Optimize: power-of-two sizes, the right compression for each map, mipmaps.
- 05Validate. The pre-flight check flags missing textures, bad naming, duplicate numbers and slot overflows, with the fix beside each one.
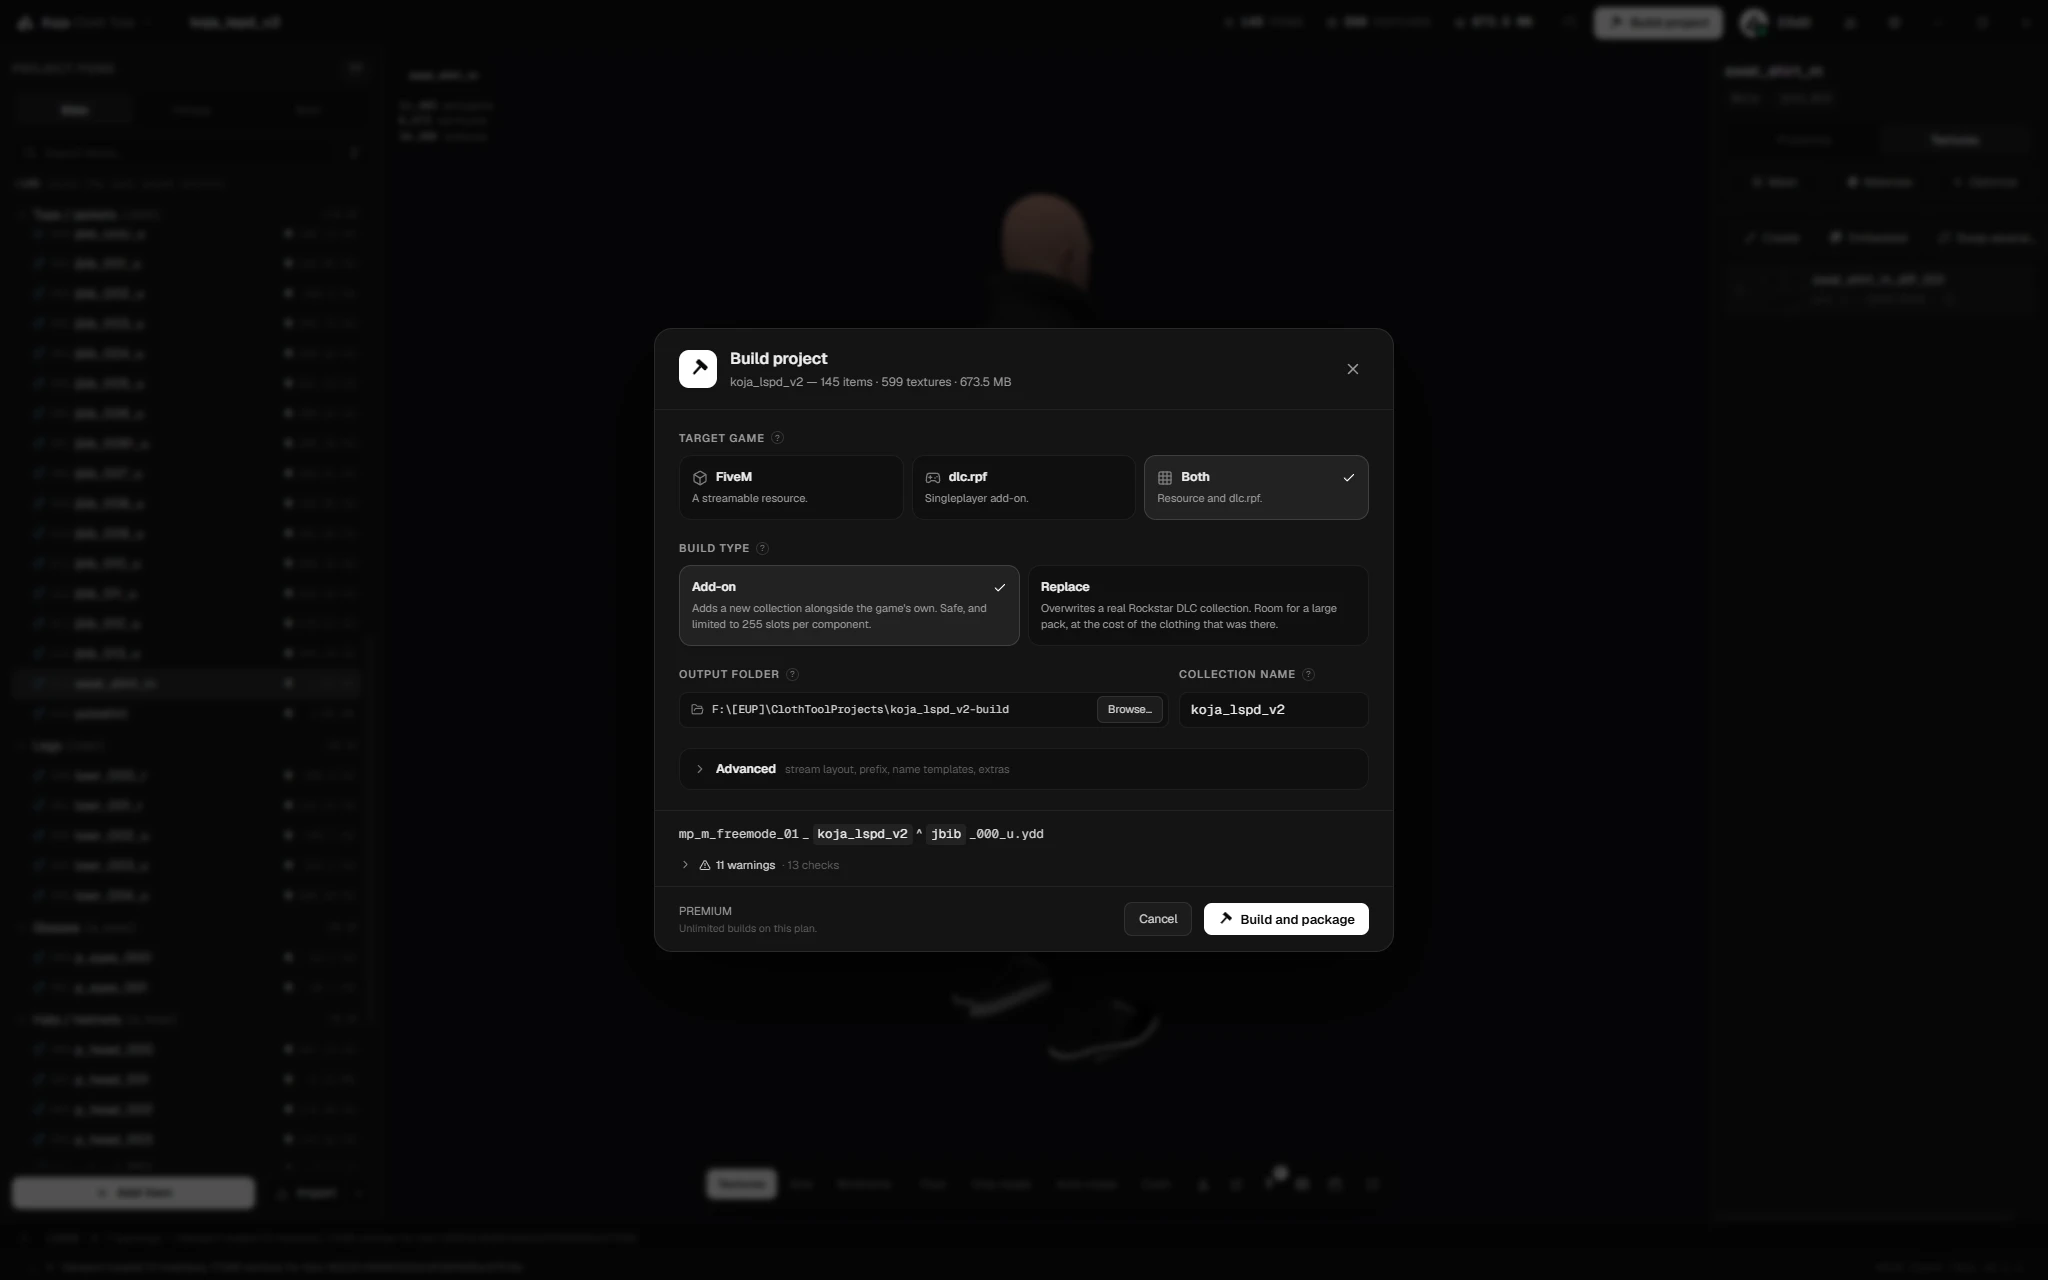
- 06Build. Pick the FiveM target and a collection name. Out comes the folder above — stream files renamed,
.ymtand shop meta generated,fxmanifest.luawritten — plus aclothes_info.jsonwith each item's index inside its collection. - 07Start it. Drop the folder into
resources,ensureit inserver.cfg, restart.
The first pack takes about ten minutes. The same project also builds a singleplayer dlc.rpf, and with a licence you can paint textures on the garment, make tattoos for illenium-appearance, slim heavy meshes and work on one pack as a team.
Questions
Do I need to rename files to the GTA format myself?
No. Set the slot, number and gender in the tool; it writes the exact GTA file names when you build.
How many clothes fit in one pack?
Up to 128 drawables per component slot, per gender, in each collection. Need more? Start a second collection — just keep an eye on how many collections your server loads across all its packs.
Does it work for EUP and uniforms?
Yes — uniforms are clothing like any other. Our own LSPD EUP pack is built the same way.
Is it free?
Importing, previewing, validating and building are free, with a monthly build allowance. Premium adds the Texture Creator, Tattoo Creator, Mesh Optimizer and team work — see what a licence adds.
Full documentation, including common errors and naming rules, is at docs.kojascripts.eu. Stuck on a pack? Ask in our Discord.